-
KubernetesDevOps/Container 2019. 9. 5. 01:31
1. Overview

Kubernetes is a system to deploy containerized apps. Nodes in Kubernetes are individual machines (or VM's) that run containers. Masters are machines (or VM's) with a set of programs to manage nodes. Kubernetes didn't build our images. It got them from somewhere else such as the docker hub. Kubernetes (the master) decided where to run each container. Each node can run a dissimilar set of containers. To deploy something, we update the desired state of the master with a config file. The master works constantly to meet your desired state.
Kubernetes follows the primary/replica architecture. The components of Kubernetes can be divided into those that manage an individual node and those that are part of the control plane.
1.1 What is Kubernetes
System for running many different containers over multiple different machines
1.2 Why use Kubernetes
When you need to run many different containers with different images
2. Description
2.1 Intuition
If we had the ability to spin up these additional machines and just create a ton of additional copies of that work or container on each one. Chances are we didn't really need multiple copies of Nginx or the server API or the client. They were all relatively simple and for the most part, were just kind of serving up flat files or responding to very simple API requests. It was only the work or container that was doing some major computational work inside of our application. And so it probably would have been ideal if we could have done something like this instead.

3. Architecture

Kubernetes is made up of many components that do not know are care about each other. The components all talk to each other through the API server. Each of these components operates its own function and then exposes metrics, that we can collect for monitoring later on. We can break down the components into three main parts.
- The Control Plane - The Master.
- Nodes - Where pods get scheduled.
- Pods - Holds containers.

3.1 Master
The Kubernetes master is the main controlling unit of the cluster, managing its workload and directing communication across the system. The Kubernetes control plane consists of various components, each its own process, that can run both on a single master node or on multiple masters supporting high-availability clusters. The various components of Kubernetes control plane are as follows:
3.1.1 etcd
etcd is a persistent, lightweight, distributed, key-value data store developed by CoreOS that reliably stores the configuration data of the cluster, representing the overall state of the cluster at any given point of time. Just like Apache ZooKeeper, etcd is a system that favors consistency over availability in the event of a network partition.
3.1.2 API Server
The API server is a key component and serves the Kubernetes API using JSON over HTTP, which provides both the internal and external interface to Kubernetes.

3.1.3 Scheduler
The scheduler is the pluggable component that selects which node an unscheduled pod (the basic entity managed by the scheduler) runs on, based on resource availability. The API server processes and validates REST requests and updates state of the API objects in etcd, thereby allowing clients to configure workloads and containers across Worker nodes.
3.1.4 Controller manager
A controller is a reconciliation loop that drives actual cluster state toward the desired cluster state, communicating with the API server to create, update, and delete the resources it manages (pods, service endpoints, etc.).
3.2 Node
A Node, also known as a Worker or a Minion, is a machine where containers (workloads) are deployed or a virtual machine that will run our containers. Every node in the cluster must run a container runtime such as Docker, as well as the below-mentioned components, for communication with the primary for network configuration of these containers.
3.2.1 Kubelet
Kubelet is responsible for the running state of each node, ensuring that all containers on the node are healthy.
3.2.2 Kube-proxy
The Kube-proxy is an implementation of a network proxy and a load balancer, and it supports the service abstraction along with other networking operations.
- Userspace proxy mode

- IPVS proxy mode

- iptables proxy mode

3.2.3 Container runtime
A container resides inside a pod. The container is the lowest level of a micro-service, which holds the running application, libraries, and their dependencies. Containers can be exposed to the world through an external IP address. Kubernetes supports Docker containers since its first version, and in July 2016 rkt container engine was added.

3.3 Cluster
A collection of nodes + a master to manage them.
Cluster = Master node + Work nodes

3.4 Environment
- Development
- Production

4. Pod
Pod Runs one or more closely related containers. More or less a running container. Technically, a pod can run multiple containers but we won't do this.
In the world of Kubernetes, we don't have the ability to just run one naked single container by itself with no associated overhead. The smallest thing that we can deploy is a pod. So we're always going to be declaring or seems we're always going to be deployed deploying containers within a pod. That's the smallest thing that we can deploy to run a single container. So the requirement of a POD is that we must run one or more containers inside of it.

The purpose of a pod is meant to group it. It is the purpose of a POD is to allow that grouping of containers with a very similar purpose or containers that absolutely positively must be deployed together and must be running together in order for an application to work correctly.

In the world of a POD when we start to group together containers we're grouping to gather containers that have a very discrete very tightly coupled relationship. In other words, these are containers that absolutely have a tight integration and must be executed with each other.

5. Service
Service Sets up networking in a Kubernetes Cluster. Service provides an easy to remember URL to access a running container. Service also provide networking from the outside world to a pod.

Types of Services
- Cluster IP: Sets up an easy-to-remember URL to access a pod. Only exposes pods in the cluster
- Node Port: Makes a pod accessible from outside the cluster
- Load Balancer: Makes a pod accessible from outside the cluster. This is the right way to expose a pod to the outside world
- External Name: Redirects an in-cluster request to a CNAME url
5.1 IP Address and Routing

When creating a service, one or more ports can be configured. A common example would be listening on port 80 for HTTP and port 443 for HTTPS.
A core design feature of Kubernetes is a routable IP address for every service and pod in the cluster. Assigning IPs this way eliminates port conflicts between applications across the cluster. This allows any application team to bind to any port they require instead of reconfiguring databases or web servers to listen on non-standard ports.
Google learned this lesson the hard way over their decade of experience deploying this type of infrastructure. Kubernetes empowers you to avoid these mistakes before years of cruft, complexity, and technical debt build-up.
While this design decision complicates the networking configuration slightly, your operations team can set up and configure flannel, which is an open-source project designed by CoreOS to enable this type of routing for Kubernetes.

{
    "kind": "Service",
    "apiVersion": "v1",
    "metadata": {
        "name": "Frontend Service"
    },
    "spec": {
        "selector": {
            "app": "webapp",
            "role": "frontend"
        },
        "ports": [
            {
                "name": "https",
                "protocol": "TCP",
                "port": 443,
                "targetPort": 443
            }
        ]
    }
}
5.2 Service Discovery
Kubernetes services are designed to be a stable abstraction point between the different components of your applications. Contrast this with pods that are being created and destroyed with each software deployment or any time a service requires more capacity.
Each service has a unique IP address and a DNS hostname. Applications that consume this service can be manually configured to use either the IP address or the hostname and the traffic will be load-balanced to the correct pods. SRV-based discovery is also configured by default for all ports the service is listening on.
Keep in mind that DNS libraries used in many programming languages don't properly respect TTLs and will cache DNS lookups longer than expected. For this reason, round-robin DNS isn't used unless specifically enabled. Utilizing the service's IP address will completely avoid this issue.
To do automatic service discovery, environment variables containing the IP address of each service in the cluster are injected into all containers. For example, a service named "Redis-master" could be accessed from a pod by using information stored in these variables:
REDIS_MASTER_SERVICE_HOST=10.0.0.11
REDIS_MASTER_SERVICE_PORT=6379
REDIS_MASTER_PORT=tcp://10.0.0.11:6379
REDIS_MASTER_PORT_6379_TCP=tcp://10.0.0.11:6379
REDIS_MASTER_PORT_6379_TCP_PROTO=tcp
REDIS_MASTER_PORT_6379_TCP_PORT=6379
REDIS_MASTER_PORT_6379_TCP_ADDR=10.0.0.11
5.2.1 Discovery of Resources Outside the Cluster
A service can also point to an external resource such as a cloud database or microservice that doesn't run on the Kubernetes cluster. Using a Kubernetes service to point outside the cluster allows you to execute service discovery from your pods just like a service running in the cluster.
Each application development team can choose which method (IP, DNS, etc) best match their workflow. The important takeaway is that service discovery is standardized across the cluster and can be depended on by all users.
5.3 Load Balancing
Services are automatically configured to load balance traffic to pods matching the label query. A random algorithm is used and is currently the only option. Session affinity can be configured to send traffic to pods by client IP.
5.4 Zero Downtime Deployments
During a deployment, new pods will be launched, running the updated version of your software. While this deployment is in progress, inbound traffic is being routed to the pods matching the service's pod label query.
Modifying this label query to be broad or specific is a flexible mechanism to point traffic towards a specific version of your application, either old or new, or send traffic to both at the same time.

5.5 Components
5.5.1 NodePort

- Node Port makes a pod accessible from outisde the cluster.
- Node port usually only used for dev purpose
- Rather than using any naming system we instead use a system in Kubernetes is called the label selector system.

5.5.2 ClusterIP
Cluster IP sets up easy-to-remember URL to access a pod. It only exposes pods in the cluster. The cluster IP is a little bit more restrictive form of networking the cluster IP is going to allow any other object inside of our cluster to access the object that the cluster IP is pointing at. But nobody from the outside world.

5.5.3 Ingress
Exposes a set of services to the outside world. Traffic is going to come into this ingress and then once traffic has come in it is then effectively inside of our cluster. And so from that point on our cluster IPs will be accessible only through the ingress service.
This is a type of service that is going to eventually get some amount of traffic into our application and allow our outside users to access all the different pods that are running containers that they need to get at to actually access out.

5.5.4 LoadBalancer

Load Balancer makes a pod accessbie from outside the cluster. This is the right way to expose a pod to the outside world.

In our case, our application has two sets of POD So we want to expose it to the outside world which is 100 percent common. But a load balancer would not be able to give us access to both the multi-server set and the multi-client as well.
Now when you make a load balance or service you are not only getting access to a specific set of pods when you make a load balance or service Kubernetes is going to actually do something in the background for you as well. It's going to reach out to your cloud provider so be it. AWS or Google Cloud or whoever else you might be using and it's going to create a load balancer using their configuration or definition of what a load balancer is. So the AWS world you might get a classic load balancer or an application load balancer. Kubernetes is going to request AWS like an Application load balance or a classic load balancer. So it's going to set up this external resource outside of your cluster and then it's going to automatically configure that load balancer to send traffic into your cluster and access the load balancer service that has been set up to govern access to this very specific set of pots. So that's what a load balancer does. Again kind of a more legacy thing.
5.5.5 External Name
External Name redirects an in-cluster request to a CNAME url
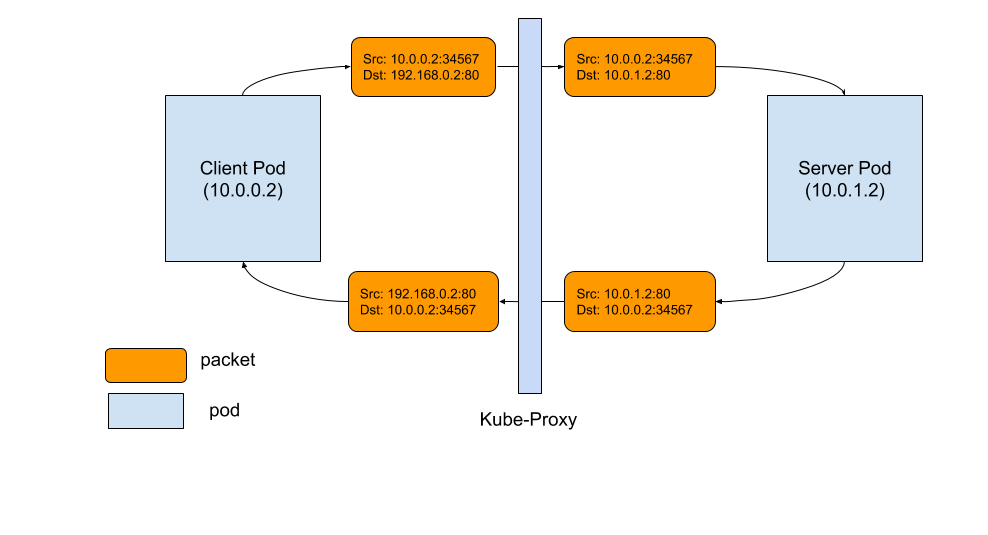
6. Kube-proxy

Kube-proxy their queue proxy is essentially the one single window to the outside world. So anytime that request comes into a node it's going to flow through this thing called the Kube-proxy its proxy is going to inspect the request and decide how to route it to different services or different pods that we may have created inside of this node.


7. Deployment

Monitors a set of pods, make sure they are running and restarts them if they crash. Maintains a set of identical pods, ensuring that they have the correct config and that the right number exists.
We very specifically did not talk about replica sets or replication controllers because they're kind of deprecated and the recommendation is to use deployments instead of replica sets or replica replication controllers so just see you know some of these pieces of the terminology you'll see and hear we very purposefully did not cover because they are things that are not quite supposed to use or seen as the best way of doing things with Kubernetes anymore.
7.1 Difference between Deployment, Service, and Pod
7.1.1 Pods
- Runs a single set of containers
- Good for one-off dev purposes
- Rarely used directly in production
7.1.2 Deployment
- Runs a set of identical pods
- Monitors the state of each pod, updating as necessary
- Good for dev
- Good for production
7.2 Relationship between Deployment, Service, and Pod
- Pods - runs one or more closely related containers
- Services - set up networking in a Kubernetes cluster
- Deployment - Maintains a set of identical pods, ensuring that they have the correct config and that the right number of them exist.
8. Secrets
Securely stores a piece of information in the cluster, such as a database password, API key, SSH key, and so on. Our secret being imperative and nature are going to have to make sure that we manually create this thing in any environment that we eventually take our application to.
9. Deployment Flow

9.1 Imperative Deployment

9.2 Declarative Deployment

10. Maintaining sets of Containers with deployments
10.1 Updating Existing Objects
10.1.1 Imperative
- Run a command to list out current running pods
- Run a command to update the current pod to use a new image
Any time we create an object in Kubernetes anytime to change something we do not do imperative edits. If we can ever avoid it. And so if you could create up your yeah you can enter in a YAML file but you don't really have a good record of what that YAML is. You can also say go to maybe pods over here and click on APOD and you can click on edit and make discrete changes to the YAML file or the config file directly right here. But again if you make changes on the dashboard they do not get somehow persisted back over to the folders and files that we've created inside of our project directory. So whenever possible we always change the config files and not the actual configuration directly on the dashboard.
10.1.2 Declarative
- Update our config file that originally created the pod
- Throw the updated config file into kubectl

Name and Kind are our unique identifying tokens for any object that we create. If you ever want to update an existing object you're going to take your configuration file. you're going to always leave the names the same and the kind the same and you can change the rest of the configuration file and then feed it all into kubectl and master is going to automatically find the existing object and make updates to it.
10.2 Declarative Updates in Action
10.3 Limitations in Config updates
10.4 Running Containers with Deployment

10.5 Walking Through the Deployment Config
selector:
    matchLabels:
      component: web
  template:
    metadata:
      labels:
        component: web
10.7 Triggering Deployment Updates
10.7.1 Delete pods to get the deployment to recreate them with the latest version
Cons
- We could very easily accidentally delete the wrong set of pods
- Deleting those pods for a period of time any user trying to access our application
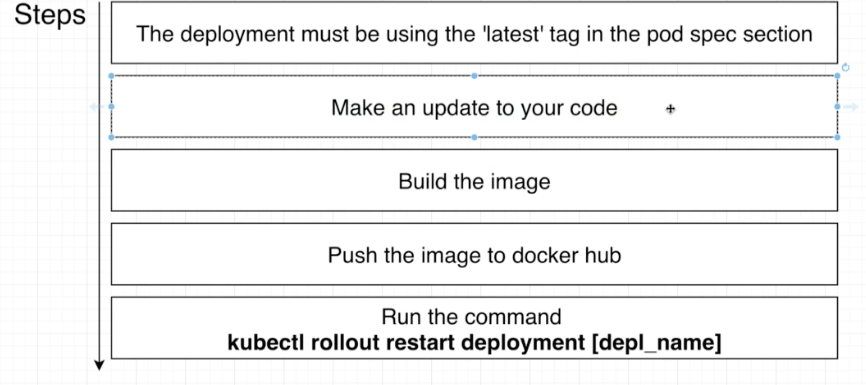
10.7.2 Tag built images with a real version number and specify that version in the config file
Cons
- Adds an extra step in the production deployment process
10.7.3 Use an imperative command to update the image version the deployment should use
Cons
- Uses an imperative command
11. Relationship between Docker and Kubernetes
Kubernetes and Docker are both comprehensive de-facto solutions to intelligently manage containerized applications and provide powerful capabilities, and from this some confusion has emerged. “Kubernetes” is now sometimes used as a shorthand for an entire container environment based on Kubernetes. In reality, they are not directly comparable, have different roots, and solve for different things.
Docker is a platform and tool for building, distributing and running Docker containers. It offers its own native clustering tool that can be used to orchestrate and schedule containers on machine clusters. Kubernetes is a container orchestration system for Docker containers that is more extensive than Docker Swarm and is meant to coordinate clusters of nodes at scale in production in an efficient manner. It works around the concept of pods, which are scheduling units (and can contain one or more containers) in the Kubernetes ecosystem, and they are distributed among nodes to provide high availability. One can easily run a Docker build on a Kubernetes cluster, but Kubernetes itself is not a complete solution and is meant to include custom plugins.
Kubernetes and Docker are both fundamentally different technologies but they work very well together, and both facilitate the management and deployment of containers in a distributed architecture.
11.1 Difference between Docker Compose and Kubernetes
Docker Compose Kubernetes Each entry can optionally get docker-compose to build an image Kubernetes expects all images to already be built Each entry represents a container we want to create One config file per object we want to create Each entry defines the networking requirement we have to manually set up all networking 11.2 Multiple Docker Installations

11.3 Why mess with Docker in the Node
- Use all the same debugging techniques we learned with Docker CLI even though many of these commands are available through kubectl
- Manually kill containers to test Kubernetes ability to self-heal
- Delete cached images in the node
12. Volumes
- Volume
- Persistent Volume
- Persistent Volume Claim
12.1 Volume
An object that allows a container to store data at the pod level in Kubernetes, in contrast with generic container terminology which is some type of mechanism that allows a container to access a filesystem outside itself.

12.1.1 Volume tied to the Pod
The volume is tied to the pod and so is the pod itself ever dies the volume dies and goes away as well. So a volume and Kubernetes will survive container restarts inside of a pod. But if the pod itself for whatever reason ever gets recreated or terminated deleted whatever happens then the pod and the volume inside of it totally gone. A volume is really not appropriate for storing data such as the database.

12.1.2 Volume tied to the Deployment

12.2 Persistent Volume
Persistent volume is we are creating some type of long term durable storage that is not tied to any specific POD or any specific container. So you can kind of imagine that that persistent volume is outside the pod completely separate from the pod.

12.3 Difference Persistent Volumes and Persistent Volume Claims
12.3.1 Persistent Volume Claim
persistent volume claim is an advertisement. It's just an advertisement that says Here are the different options that you have access to for storage inside of this particular cluster.
12.3.2 Persistent Volume
And so inside of a Kubernetes cluster, we might have some number of persistent volumes that have been created ahead of time. These are actual instances of hard drives essentially that can be used right away for storage any persistent volume that is created ahead of time inside of your cluster. It's something that we refer to as statically provisioned so statically provisioned persistent volume is something that we have very specifically created ahead of time. On the other hand, we also had another option that could have been created on the fly. So this is referred to as a dynamically provisioned persistent volume. It is another storage option that is not created ahead of time. It's only created when you put into either your pod ask for it.
12.4 Access Modes
- ReadWriteOnce: Can be used by a single node
- ReadOnlyMany: Multiple nodes can read from this
- ReadWriteMany
12.5 Process
12.5.1 PC

12.5.2 Cloud

13. Example


We're going to feed it into kubeCTL and then the project that we're using ingress Nginx is going to create a single deployment whose job is to both read in the ingress config and simultaneously create a pod that meets all those different routing rules.
13.1 Why Using Ingress-Nginx instead of custom Nginx configuration

The reason that we are still going to make use of ingress and generics as opposed to setting the setup man stuff manually is that when you make use of the Nginx ingress project it actually has a bunch of code added into it that is very much aware of the fact that it is operating inside of a Kubernetes cluster.

Instead, the cluster IP service does still exist and it still is working to essentially keep track of all these different ports. But that's how we get an incoming request to the next pod right here the enter X pod is going to actually route the request directly to one of these different parts completely bypassing that cluster IP service. The reason that this is done is to allow for features like say sticky sessions which is a reference to the fact that we sometimes want to make sure that if one user sent to request our application we want to make sure that both those requests go to the exact same server. And there are some cases where that feature is extremely handy and actually a 100 percent necessary to have.

14. Example
# K8s is extensible. we can add in our own custom objects.
# This specifies the set of objects we want K8s to look at
apiVersion: v1

# The type of object we want to create
kind: Pod

# Config options for the object we are about to create
metadata:

# When the pod is created, give it a name of 'posts'
  name: posts

# The exact attributes we want to apply to the object we are about to create
spec:

# We can create many containers in a single pod
  containers:

# Make a container with a name of 'posts'
    - name: posts

# The exact image we want to use
      image: demyank88/posts:0.0.1
15. Common Kubectl Commands
15.1 Pod


15.2 Deployment

16. Updating Deployments
Whenever we make a change to a config file we have to eat it back into the cluster using that same kubectl apply command. Whenever you apply a config file Kubernetes is going to know whether this is a config file has already been fed into it before or if it's something brand new.
1.1 Updating the Image Used by a deployment

1.1.1 Drawbacks
The reason that this is a problem is that any time we want to make a change to our application or redeploy our application we would have to always open up this config file and make a change to specific version number.

1.2 Updating the Image used by a deployment 2
17. Reference
https://kubernetes.io/docs/concepts/
https://kubernetes.io/docs/tutorials/kubernetes-basics/
https://kubernetes.io/docs/concepts/overview/components/
https://kubernetes.io/docs/concepts/workloads/controllers/deployment/
https://kubernetes.io/docs/concepts/workloads/pods/pod-overview/
https://stackoverflow.com/questions/41325087/what-is-the-difference-between-a-pod-and-a-deployment
https://www.joyfulbikeshedding.com/blog/2018-03-26-studying-the-kubernetes-ingress-system.html
https://kubernetes.io/blog/2018/04/30/zero-downtime-deployment-kubernetes-jenkins/
https://coreos.com/kubernetes/docs/latest/services.html
https://kubernetes.io/blog/2018/04/30/zero-downtime-deployment-kubernetes-jenkins/
https://www.sumologic.com/blog/kubernetes-vs-docker/
https://linuxacademy.com/blog/containers/deploying-services-in-kubernetes/